
.png)
Initial Signature: A Simple Guide for Beginners (With Examples)
- Chiko Lin
- Jul 1, 2024
- 6 min read
Updated: Dec 10, 2024
Are you struggling with spending time signing hundreds of documents? You're not alone. Many professionals including doctors, actors, musicians, Arthur, artists, and any business-related roles, find themselves buried under a mountain of paperwork, losing valuable time that could be spent on more important tasks. This blog will walk you through what is an initial signature and its importance. We will also share our insights on creating your initial signature within 4 simple steps. If you want a FREE signature design for your name, follow us on Instagram and complete the form.
Let's get to it:
What is an Initial Signature?

An initial signature refers to using a person's initials to signify approval or acknowledgment of a document. It's a way of writing your name much faster than writing out your full signature and is often used for things like sign-in sheets, attendance logs, or minor document changes. For instance, when approving a specific clause in a contract or verifying minor changes, stakeholders often use their initials to expedite the process.
An initial signature is the individual's initials, usually consisting of the first letter of their first name and the first letter of their last name. For example, Dean Doe would use "D.D." as his initials.
Why is it important?

Initial signatures are crucial across various professional roles, including business, medicine, authorship, and art. Initials are quicker and easier to write, which can be especially useful in high-volume situations like business meetings or legal reviews
For example, as a doctor, initials on medical forms or patient records signify that critical information has been reviewed, such as diagnoses, treatment plans, and medication orders. This all needs someone to confirm whether it has been actioned and keep everything on track. During a busy period, that will be a heavy workload as you might need to sign hundreds of paperwork, which is very time-consuming. An initial could reduce the risk of errors and ensure accurate and consistent patient care.
noting transparency and accountability in various professional fields.
However, when signing some formal documents, initials can be used to acknowledge specific sections, but they do not replace the need for a full signature. Without a full signature, the contract may not be considered legally binding because it lacks a clear indication of your intent to be bound by the entire document.
How to sign with initials

How to sign initials effectively is a valuable skill. It involves finding a balance between speed, legibility, and personal style. Your initials should be efficient enough for those high-volume signing situations, yet distinctive enough to be yours. Think of it as a mini-signature for your full name. It could be a simplified design of your full signature while keeping a similar style so everyone can easily recognize it.
4 Easy steps to develop your initial design
STEP 1: Get some inspirations from extensive resources
First of all, if you completely have no idea of what should be expected, I will first advise you to have a look at the list of resources below and find your preference thus clarifying your direction:
HandwrittenSign Portfolios
External Resources
HandwrittenSign - Pinterest Board
Check out my list of blog posts detailing different signature styles I've created. Whether you're into sophisticated scripts or minimalist designs, you'll find something that catches your eye.
STEP 2: Make it easier and Emphasize crucial elements


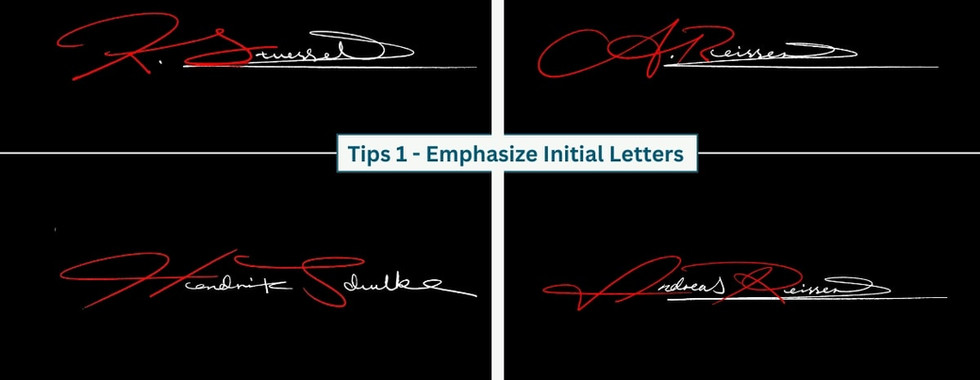
To give you more insights on that, We attach a few examples from our portfolios above to guide you on which areas could be developed and improved.
Identify the key elements of your original signature that you want to retain in the new version. Focus on specific features such as a distinctive letter, unique curves, or a particular shape that stands out and gives your signature its character. Also, Concentrate on several unique elements from your original signature that you can integrate into the new one. This may involve a specific loop, curve, or flourish that defines your signature by highlighting these elements, you can ensure that your new signature maintains consistency and personal identity.
STEP 3: Engage in differnt concepts and repeat your trials

If you are following strictly the first two steps, I am sure you already have some crazy ideas in your mind at the moment. Now, it is time to put your ideas into practice. Try to explore different styles, sizes, and shapes to experiment with various iterations of your signature. Test out cursive, block letters, and abstract forms. Work on writing your signature quickly to find a version that combines efficiency and aesthetic appeal. Think about adding unique flourishes like lines, rounds, and real connections between the initials or decorations to make it more appealing.

Generally, we suggest you use only two initial letters in your name to develop your concept because it can make it balanced and easier to find a way to connect. Incorporating a middle initial can provide a good flair, however, it is crucial to uphold a sense of simplicity. Explore various combinations and positions to observe how the initials complement each other. Consider the overall flow and readability of the signature, as a well-proportioned layout will leave a lasting and polished impression. Persistently adjust and perfect your idea until you are satisfied with the final.
STEP 4: Wrap up and drill - Practice plan
Once you have finalized your new signature design, dedicate time to practicing it consistently. Repetition is key to developing muscle memory, allowing you to write your signature quickly and accurately without conscious effort. Regular practice will ensure that your new signature becomes second nature, making it effortless to reproduce every time. This consistency will not only enhance your confidence but also ensure your signature remains recognizable and professional across all documents.
Tip 1: Create a Stencil For Your Daily Practice

Creating a stencil for your initial signature is a game-changer for refining your brand. This simple yet effective tool allows you to practice consistently, ensuring that each stroke and flourish becomes second nature. Start by designing your ideal signature, then transfer it onto a stencil. By using this stencil daily, you'll develop muscle memory, leading to a smoother, more confident signature over time. Not only does this practice enhance the aesthetics of your signature, but it also boosts your confidence every time you sign a document.
Tip 2: Record a video of yourself writing your name
A video shows you how your signature is made how fast you sign, where you slow down, and where you stop. Watching this can help you improve your signature by showing you what you need to work on. Also, it's a good way to see how you get better as time progresses. I've sent a video for you to watch.
By implementing these two best practices, you will see how fast you are to master your new initial signature. By practicing your signature and watching your signing video, you can improve and be proud of your signature. Keep practicing, and soon you will be able to sign without thinking about it!
Conclusion
If you're looking for a more tailored approach for your initial design, Look at our signature design service. In HandwrittenSign, we provide different signature designs along with video tutorials teaching you how to master your design and handwriting worksheets for your daily practice.